

When you’re looking at ways to add value to your Dallas home while cutting down on those sky-high heating bills, installing a wood stove might just be the smartest move you make this year. But here’s where most homeowners get sticker shock: the installation costs.
Professional chimney installation can easily run $3,000 to $5,000 or more, turning what should be a money-saving upgrade into a major expense. Installing your own chimney system might sound complicated, but it’s actually a lot simpler than you think. With the right guidance and quality materials, you can tackle this project yourself and pocket thousands of dollars in the process.
Why Dallas Homeowners Are Going DIY
The Texas housing market has been red-hot for years, and with that comes higher costs across the board. Contractors are busier than ever, which drives up installation costs. Meanwhile, energy prices keep climbing, making alternative heating sources more attractive than ever.

A quality wood stove can slash your heating bills by 50% or more during those chilly North Texas winters. When you factor in the money you’ll save by doing your own installation, you’re looking at a payback period of just a few seasons instead of several years.
But beyond the financial benefits, there’s something satisfying about completing a project like this yourself. You’ll know exactly how everything is installed, which components were used, and how to maintain the system properly. That peace of mind is worth plenty on its own.
Understanding Chimney System Basics
Before diving into installation, it helps to understand what you’re working with. A modern wood stove chimney system consists of several key components that work together to safely vent combustion gases outside your home.
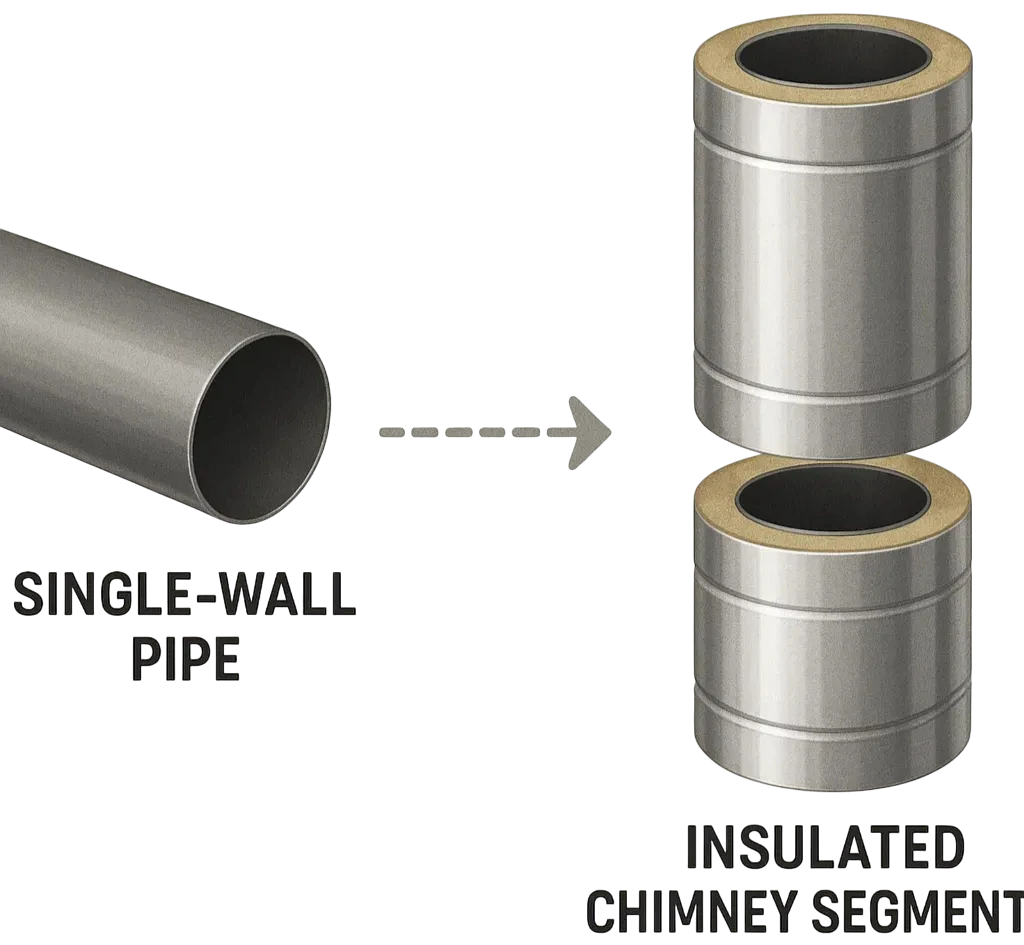
The stove pipe connects your wood stove to the chimney system. This is typically single-wall or double-wall pipe that runs from the stove outlet to where it meets the insulated chimney pipe. The diameter matters here – most residential installations use 6-inch pipe, though some larger stoves require 8-inch systems.
Once you transition from the living space to areas where the pipe passes through walls, ceilings, or the roof, you’ll switch to insulated chimney pipe. This double-wall or triple-wall pipe is designed to maintain safe clearances from combustible materials while keeping the flue gases hot enough to maintain proper draft.
Manufacturers have standardized connections, included detailed instructions, and engineered systems that don’t require specialized tools or extensive construction experience.
Planning Your Installation
Every successful installation starts with proper planning. Begin by determining the best location for your wood stove, keeping in mind both heating efficiency and installation requirements. You’ll want to minimize the number of turns and horizontal runs in your chimney system, as straight vertical runs provide better draft.
Measure carefully from your proposed stove location to where the chimney will exit through the roof. This helps you determine exactly what components you’ll need and avoid costly delays while waiting for additional parts.
Local building codes do apply to chimney installations, even DIY ones. While requirements vary by municipality, most areas require permits for new chimney installations. The good news is that most building departments are familiar with modern chimney systems and the permitting process is usually straightforward.
Don’t forget about clearances to combustible materials. Modern insulated chimney systems have specific clearance requirements that are much less restrictive than older masonry chimneys, but they still need to be followed exactly. Your installation instructions will spell these out clearly.
Selecting Quality Components
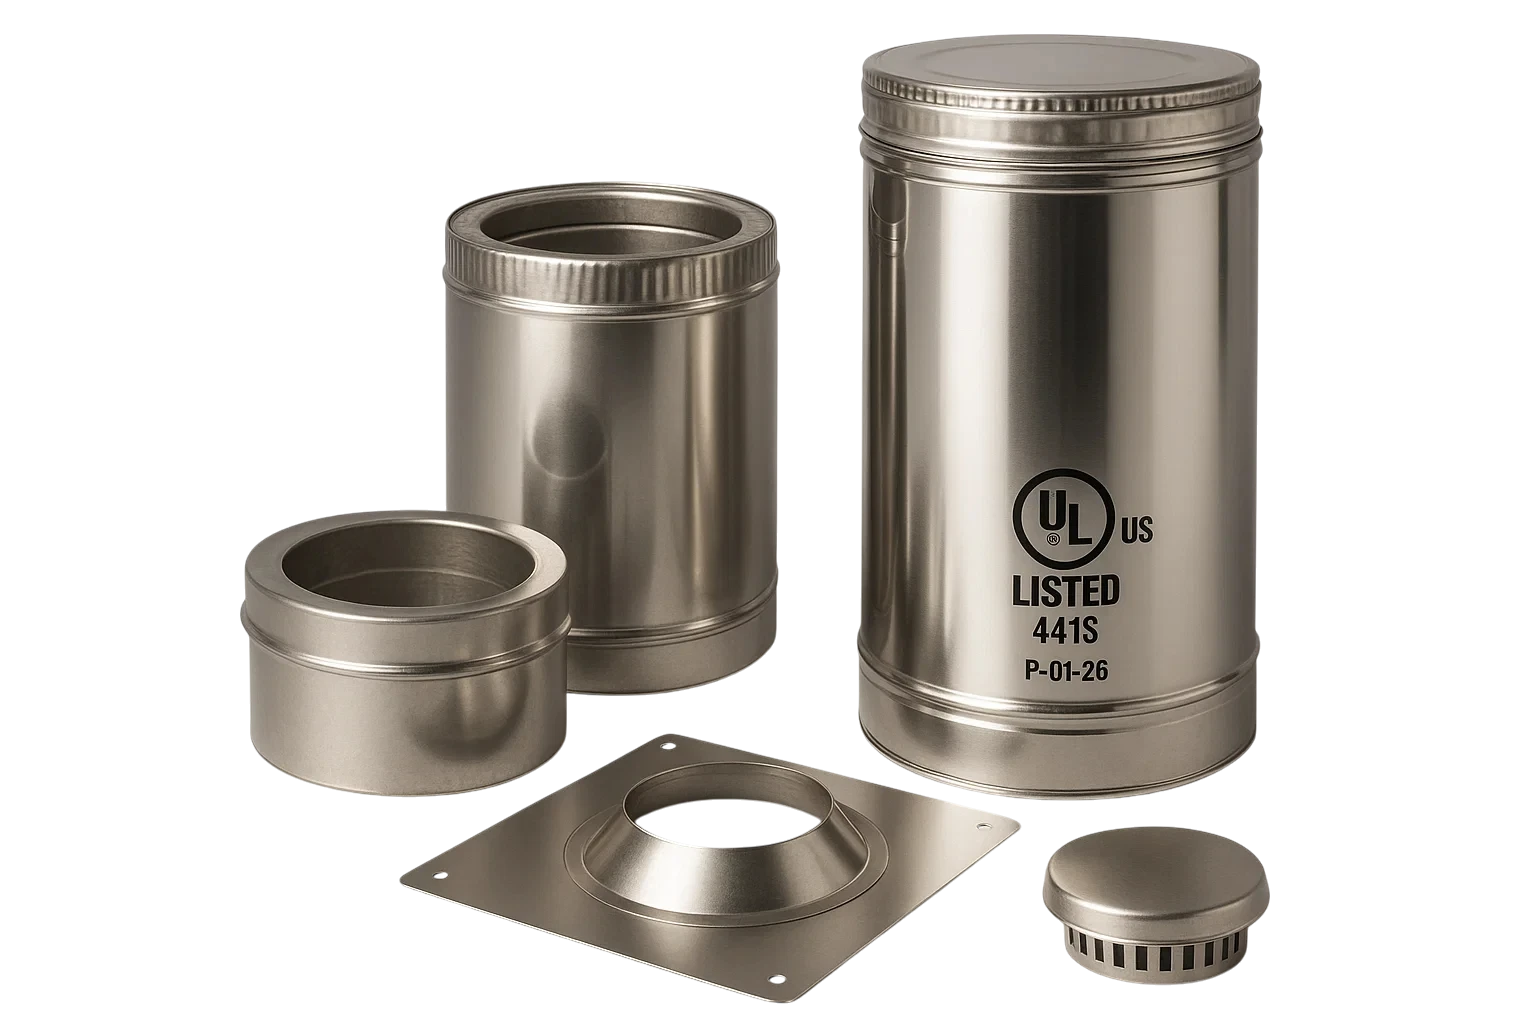
This isn’t the place to cut corners. Your chimney system is a critical safety component, and quality materials are essential for safe, reliable operation. Look for UL‑listed chimney systems that are tested and listed by recognized testing laboratories.
When shopping for the best chimney pipes for wood stoves, you’ll find systems designed specifically for different applications. Class A chimneys are required when passing through or near combustible materials, while connector pipe is used in the living space from the stove to the wall or ceiling penetration.
A 6-inch stove pipe diameter is standard for most residential wood stoves, though you should always verify what your specific stove requires. Using the wrong diameter pipe can create dangerous draft problems and void your stove’s warranty.
Many suppliers offer wood stove chimney kit packages that include all the components you need for a typical installation. These kits take the guesswork out of ordering and ensure all your components are compatible.
The Installation Process

Modern chimney systems are designed to go together logically, almost like a sophisticated set of building blocks. Most installations follow a similar sequence, starting with the stove pipe connections and working upward through the house to the roof termination.
You’ll typically start by connecting the first section of stove pipe to your wood stove outlet. From there, you’ll run pipe to your wall or ceiling penetration point, where you’ll install the appropriate thimble or support box.
The transition to insulated chimney pipe happens at this penetration point. This is where the single-wall connector pipe ends and the double-wall or triple-wall chimney pipe begins. This transition point is critical for both safety and proper system function.
Once you’re in the insulated chimney section, installation becomes a matter of assembling sections as you work your way up through the house. Most systems use a twist-lock connection that creates both a mechanical joint and an airtight seal.
The roof penetration requires careful attention to weatherproofing. A quality roof flashing system will keep water out while allowing the chimney to expand and contract with temperature changes. Take your time here – a small leak can cause big problems down the road.
Getting Expert Guidance When You Need It
Even with detailed instructions and quality components, questions come up during installation. Maybe you’re not sure about a specific clearance requirement, or you need advice on the best way to route your chimney through a particular part of your house.
This is where having access to experienced technical support makes all the difference. The specialists at Flue-Pipes understand that DIY installers need a different kind of support than contractors. They can walk you through specific installation challenges over the phone, helping you work through problems without requiring an expensive service call.
Having this kind of backup gives you confidence to tackle the project yourself while knowing help is available if you need it. It’s like having an experienced installer looking over your shoulder, ready to offer advice when you need it.
Cost Savings That Add Up

A typical professional installation might cost $4,000 to $6,000, while the same chimney system purchased directly costs $800 to $1,500 depending on height and complexity.
Even factoring in tools you might need to purchase and the value of your time, you’re looking at savings of $2,500 to $4,000 on a typical installation. For many homeowners, that’s money that can go toward other home improvement projects or simply stay in your pocket.
Safety Considerations
Working on roofs and handling chimney components require attention to safety. Take your time, use proper safety equipment, and don’t hesitate to get help when you need it. A helper makes many parts of the installation easier and safer.
Follow all manufacturer’s instructions exactly. These systems are engineered to work safely when installed according to specifications, but shortcuts or modifications can create dangerous situations.
When in doubt, consult with experts. A phone call to technical support can answer questions and ensure you’re on the right track. It’s much better to ask questions during installation than to discover problems later.
Maintenance and Long-Term Value
A properly installed chimney system should provide years of trouble-free service with minimal maintenance. Annual cleaning and inspection are typically all that’s required, and these are tasks you can handle yourself once you understand your system.
Regular maintenance protects your investment and ensures safe operation. A clean, well-maintained chimney provides better draft, burns more efficiently, and lasts longer than a neglected system.
The value added to your home by a quality wood stove installation often exceeds the cost of the materials, especially when installation costs are minimal. Energy-efficient heating options are attractive to buyers, particularly in areas where heating costs are significant.

Taking the Next Step
Installing your own wood stove chimney system represents both an immediate cost saving and a long-term investment in your home’s value and comfort. With quality components, proper planning, and access to expert guidance when needed, it’s a project that’s well within reach of most homeowners.
The key is starting with quality materials from reputable suppliers who understand the DIY market and can provide the support you need for a successful installation. Don’t let installation costs prevent you from enjoying the benefits of efficient wood heat in your Dallas‑area home.
Your heating bills will thank you, your home’s value will benefit, and you’ll have the satisfaction of completing a significant home improvement project yourself. In today’s economy, that combination of practical benefits and personal satisfaction makes DIY chimney installation a smart choice for Dallas homeowners looking to maximize their investment.