Rising populations, increasing water costs, and aging infrastructure burden property owners with expensive problems. Right now, surging utility costs are a massive headache. If you manage multifamily apartments, you already know the drill: hidden leaks, shared billing nightmares, and a web of changing regulations are eating into your margins.
Smart water metering is how you stop the bleeding. It cuts down waste, catches leaks before they wreck a unit, and pushes the cost of usage fairly back to the people actually using the water. Let’s look at why this technology matters, which vendors fit best, and what to look for in a solution.
Why Smart Metering Matters for Texas Apartment Communities
Look at the census data: between 2021 and 2022, five of the ten fastest-growing U.S. counties were in Texas. That kind of growth puts a heavy strain on local water supplies. The Texas 2027 State Water Plan isn’t subtle about it, projecting 52.3 million residents by 2080 and pointing straight to municipal water shortages if we don’t conserve.
The state is putting its money where its mouth is. Since the 2022 plan, the Texas Water Development Board has dumped over $100 million into smart meter infrastructure, making it a primary tool in their water management strategy.
Then there’s the legal side. The Texas Water Code requires unit-level water measurement using submeters or individual utility-owned meters in all multifamily properties built after 2003. Older developments don’t currently need to meet these rules, but the writing is on the wall. The state’s long-standing commitment to individual accountability gives owners a strong reason to invest in smart metering and future-proof their properties.
Forget the regulations for a second—the immediate financial perks are what really matter. Common problems for multifamily properties include billing disputes, high levels of water waste from undetected leaks, expensive manual meter readings, and the fact that residents generally hate Ratio Utility Billing Systems (RUBS).
A good smart water submetering system solves these headaches directly:
No more billing arguments: Unit-level billing makes costs transparent. When you shift utility expenses directly to the residents using the water, they become responsible for their own habits. This drastically bumps up your cost recovery compared to RUBS.
Stopping leaks early: Detailed analytics catch abnormal usage right away. You can find and fix leaks before they cause serious property damage or spike the water bill.
Zero manual readings: Walking the property for meter checks is a waste of maintenance hours. With remote meter reading, the entire process is automated, freeing your team to focus on high priority work and increasing overall efficiency.
What To Look For In a Water Submetering Solution
A good smart water setup should handle billing automatically, smooth out your daily operations, and keep a tight grip on water waste. You need a system that actually makes your life easier, so look closely at the ROI when it comes to catching leaks and recovering costs. Installation speed is also a huge factor, If you’re managing a massive portfolio or dealing with older building retrofits, you can’t afford a messy, drawn-out installation.
It’s important to know the difference between hardware manufacturers, data platforms, system providers, and billing providers. Some properties just need new physical meters, while others need an all-in-one submetering package.
Badger Meter: Best Water Submetering Hardware
Badger Meter is a leading hardware provider for Texas communities looking to upgrade their physical meters without needing a full software ecosystem. The company’s ultrasonic E-Series meters are a favorite because they don’t have moving internal parts. That means they stay accurate longer and require way less maintenance in a multifamily setting.
They also offer automated meter reading and advanced metering infrastructure to automate the process and get a clearer picture of water usage across large portfolios.
This utility-grade hardware gives you the exact data you need to hit long-term conservation goals.
Mainlink: Best Water Submetering System Provider
Mainlink is a full-service solution provider for multifamily properties. They are a great fit for owners and managers who want a complete smart water submetering ecosystem rather than just a piece of hardware. This company provides a single platform that connects ultrasonic smart meters, wireless networks, cloud-based analytics, and billing software for fast, property-wide rollouts.
It’s heavily geared toward quick, plug-and-play retrofits. Integrated solutions like this are becoming the standard for both new builds and retrofits as Texas properties focus on water conservation, leak detection, and personalized billing.
Mainlink’s solution offers real-time leak alerts, consumption analytics, and mobile-friendly monitoring tools to help you run things more efficiently while keeping residents accountable for what they use.
Guardian Water & Power: Best Water Submetering Service & Billing Provider
Getting the data is one thing. Actually billing the residents is another. Many apartment complexes in Texas still need someone to manage the actual billing and resident support. Guardian Water & Power is well-known for its utility billing, collections management and resident service programs built specifically for multifamily housing portfolios.
Guardian offers everything from basic read-and-monitor services to a full read-bill-and-collect service that takes the entire billing process off your plate. Handing this off to a service-heavy provider is one of the easiest ways to slash your front-office workload while keeping your residents informed and happy.
The Bottom Line
With rising water costs, aging infrastructure, and stricter state regulations, smart water submetering is no longer optional—it’s just a standard part of running a profitable property today. The most successful properties are combining trusted hardware, reliable data systems, and a solid billing strategy to protect their margins.
There are many home fixtures that look simple but require some thought before you buy. The wrong wood, support, or wall anchor can turn a nice shelf into a sagging mess in a matter of months.
This guide takes you through everything you need to know, from wood varieties to pricing, so you can make the right choice for your space.
What Kind of Wood Is Best for Wall Shelves?
The best wood for wall shelves depends on three things: how much weight the shelf needs to hold, your budget, and what look you want for your home.
Oak is a popular choice. It is very durable , readily available , stains well , and can support heavy loads such as books or dishware . Red oak in particular is a solid choice for most people .
Maple is slightly harder than oak and holds up great in high-traffic areas like kitchens. It has a smoother grain, making it a great choice if you intend to paint the shelf.
Pine is an affordable option. It is a softer wood, so it can get dents and scratches more easily, but it works well for lighter items such as framed photos, small plants or decorations. Many people like the rustic look of pine, especially in living rooms and bedrooms.
Walnut is a premium option. It has a rich, dark color that complements mid-century modern and contemporary spaces perfectly, but it costs significantly more than oak or pine.
Birch plywood deserves a mention, too. It isn’t solid wood, yet it delivers surprising strength and resists warping better than many softwoods. For long shelves where sagging is a concern, ¾-inch birch plywood is a smart, budget-friendly choice.
Note
Avoid MDF for wall shelves that need to hold heavy objects. MDF looks smooth when painted, but it absorbs moisture easily, sags under heavy weight, and does not hold screws well near the edges. It works for very light decor, but fails for anything heavier.
What Is the Best Wood for Shelves That Won’t Sag?
The most common complaint people have with wooden wall shelves is that they sag, and it usually comes down to two things: using the wrong type of wood or trying to span too wide a space without adding any support.
Hard maple and red oak rank among the stiffest and most easily found wood types, and they are the best choice if sag concerns you. Their natural strength means they resist bowing under pressure far better than softer woods.
Baltic birch plywood at ¾ inch thickness provides another strong option for wider shelves. Thanks to its cross-banded layers, it resists sagging across long spans more effectively than solid softwoods of equivalent thickness.
A good rule of thumb is to limit the span for shelves carrying significant weight to under 30 inches without middle support. No matter the type of wood, every additional foot beyond that increases the likelihood of sagging.
Shelf thickness is important, too. ¾ inch for weight-bearing shelves and 1 inch for spans over 36 inches. Pine shelves are okay for small loads, but if you want to store heavy books, electronics, or anything else that weighs more than 20 to 25 pounds, it’s always best to upgrade to a strong hardwood or birch plywood.
Is It Cheaper to Build or Buy Shelves?
In most cases, building your own wooden wall shelves is significantly cheaper than buying pre-made options of similar quality.
A 36-inch solid pine shelf made from raw lumber generally costs $15 to $30 in materials. The same length in red oak could run $35 to $60. Compare that to store-bought solid wood shelves, which frequently start at $60 to $80 for plain designs and go well over $150 for anything with a high-end finish or included floating hardware.
The catch is factoring in your tools and effort. If you already own a saw, drill, and sander, making your own shelves makes sense. If you have to buy or rent equipment, the savings aren’t that great. For just one shelf, buying ready-made is usually simpler and only slightly more expensive.
Another factor is the quality of materials. Plenty of bargain store shelves, even those advertised as “real wood,” rely on MDF cores, thin veneers, or hollow cores. When you build your own, you control the materials. A handmade pine shelf stays true to solid pine, while a $40 store shelf might be mostly particleboard.
The bottom line
Building costs less and often offers better quality if you have the tools and time.
Tips for Installing Wood Shelves on a Wall
If not properly attached, even the best shelf can fall. Here are a few things to keep in mind before you start drilling:
Find the studs: Whenever possible, fasten into wall studs instead of just drywall. Studs are usually spaced 16 or 24 inches apart. A stud finder speeds this up. If you don’t have one, knocking on the wall and listening for a solid sound instead of a hollow echo can work in a pinch.
Use the right anchors: If your shelf doesn’t line up with the studs, use toggle bolts or heavy-duty hollow-wall anchors rated for the weight you plan to store. For anything beyond the lightest decorative shelves, ordinary plastic drywall plugs will fail.
Level carefully: A shelf that sits even slightly crooked will look off and can cause round objects to roll off. Take extra time with a level before drilling your pilot holes. It saves headaches down the road.
Match brackets to the load: For floating wooden wall shelves, concealed hardware works well for lighter items and gives you a clean look. For heavy shelves, exposed L-brackets anchored into studs offer greater reliability and much more support.
Frequently Asked Questions
Q: Can I use pine for heavy wall shelves?
Pine works better for small, light decor. Oak or maple will hold up much better if you plan on storing heavy items.
Q: How much weight can a wood wall shelf hold?
A 3/4-inch oak shelf supported by brackets screwed into wall studs will typically hold between 50 and 80 pounds across a 2-foot span.
Q: How deep are wall shelves?
Wall shelves are generally 8-12” deep. Bookshelves usually need 10-12” of depth and decorative shelves only need 6-8”.
Q: Do floating shelves hold as much as bracket shelves?
Not usually. Good quality floating hardware will support standard weights but for heavy duty shelving the safest way to go is to use L-brackets that are screwed directly into studs.
Q: How can I stop wooden wall shelves from wobbling?
The most common reason for wobbling is anchors that have missed the studs or hardware that has come loose over time. Make sure all screws are tight and at least some anchors are drilled securely into solid studs.
Q: Can wooden wall shelves be used in a bathroom?
Yes, but you need to seal them properly. Teak is naturally water-resistant, but oak and pine need a good waterproof finish, or else they will warp in damp settings.
Q: How far apart should wall shelves be spaced?
Books normally need a 10 to 12-inch gap between shelves. With bigger items , more space is required . 12 to 15 inches is ideal for display or storage , so you have enough room to store taller objects .
Before putting in an offer on a home, most buyers feel excited, but there’s usually some pressure too, especially when the house feels like the right one. That’s when it helps to take a step back and review the details.
If you’re looking at a new home for sale in Windsor VA, a simple checklist can help you make a decision based on facts, not just emotion.
Get Your Financing in Order First
You need to lock in your mortgage pre-approval, map out your full monthly budget, and account for every hidden ownership cost before you even think about drafting an offer. Pre-approval is the foundation because it tells you exactly what you can realistically afford while showing sellers you are a serious buyer.
Beyond that baseline, you have to look at the entire financial picture, including local property taxes, homeowners insurance, monthly utilities, and future maintenance. A home may fit the purchase budget but still stretch your everyday budget too thin. Getting clear on the numbers now can help prevent buyer’s remorse later.
Look Beyond The Staging When Touring The Property
Before moving forward, look closely at the home’s condition, layout, structure, and any visible maintenance concerns. A showing is not just about whether the home feels right. You also want to see how it’s going to work with your day to day life.
Pay attention to the floor plan, storage space, natural light, and general condition. Little details like uneven floors, an aging HVAC system, or minor water stains tend to signal much larger and more expensive problems. Even if you are touring brand-new builds, you must verify exactly what features come standard and what counts as a pricey upgrade.
Evaluate The Location And Neighborhood Livability
You have to consider the location in terms of how easy it is to commute to work, how much commercial development is around, the general vibe of the neighborhood, and how long you expect to live there.
A home can be beautifully updated and perfectly designed, but if the location makes your daily routine miserable, you will eventually hate living there.
Make sure you evaluate these key area factors:
Actual commute times during morning and evening rush hour
Proximity to grocery stores, hospitals, and essential services
Local traffic patterns and typical street noise levels
Any planned commercial or residential development in the area
For anyone looking at homes for sale in Windsor Virginia, the location often becomes a key advantage. The area offers larger lots and a much quieter rural environment while still keeping you close enough to the bigger cities for work and entertainment.
Run The Real Estate Comps To Verify The Price
Looking at similar sales tells you if the home is priced right based on real market data. Price alone never tells the whole story.
Recent sales of similar nearby homes show what buyers are actually paying, not just what a seller hopes to get. This step helps prevent you from wildly overpaying and gives your real estate agent hard data to use during negotiations.
Plan Your Home Inspections Before You Sign
You need to know exactly what property inspections you want to schedule and how they will shape your contract before you ever write the offer. Inspections typically happen after an offer is accepted, but planning for them early matters.
Most standard real estate contracts should include timelines for:
A comprehensive general home inspection
Specific structural or foundation checks if you notice cracking
Dedicated inspections for the roof, HVAC, and aging plumbing systems
It is time to know your key contract terms, especially your protective contingencies, strict timeline dates, upfront deposit requirements and specific closing conditions. An offer is more than a purchase price. It’s a legally binding contract.
Pay close attention to these deal-making terms:
The financing contingency that will protect your deposit if your loan falls through
An inspection contingency that allows you to renegotiate or walk away if there are serious issues
A realistic closing timeline that works for both you and the seller
Your earnest money deposit amount
How you structure these particular elements has a huge impact on how strong and competitive your offer looks to a motivated seller.
Understand How New Construction Offers Differ
New construction offers often involve heavy, builder-friendly contracts, strict base pricing, and far less room for negotiation than a standard existing home sale.
The process is completely different from buying a standard resale property. Pricing is typically set in stone, though builders frequently offer closing cost incentives or design center upgrades to win your business.
Always verify what standard finishes are included, read the fine print on the builder warranty, and get a realistic estimated completion date. Knowing this ahead of time will help you avoid any surprise costs once you are under contract.
Factor In Current Housing Market Conditions
Always evaluate the local housing market, current mortgage interest rates, and your direct buyer competition before you decide how aggressive your offer needs to be. Real estate markets are constantly shifting. In highly competitive seller’s markets, you might have to submit a premium offer and drop a few contingencies just to get noticed.
In slower markets, you naturally have a lot more leverage to negotiate the price down and ask for seller concessions. Staying aware of current market trends helps you position your offer to actually win.
Ask The Right Questions Before Committing
Have your real estate agent ask the listing agent directly about the property history, past insurance claims, and any red flags that could make the house hard to live in.
Always ask these questions before signing:
Exactly how old are the major mechanical systems and the roof
Are there any known structural issues or unpermitted repairs
Do the appliances, window treatments, and smart home devices convey with the sale
Are there any strict Homeowners Association rules or hidden community fees
Getting hard answers completely removes the guesswork and lets you move forward with absolute confidence.
Avoid These Costly Homebuying Mistakes
Never rush the process, skip your standard due diligence, or buy a house based entirely on your emotions. The pressure to act quickly in a hot market almost always leads to buyers ignoring massive red flags.
Watch out for these common deal-killers:
Skipping the home inspection just to win a bidding war
Stretching your monthly budget well past your comfort zone
Ignoring a bad location just because the house looks pretty
Skimming over the legal contract terms instead of reading them carefully
A structured checklist helps prevent these expensive missteps from ruining your purchase.
Why Real Preparation Makes Your Offer Unbeatable
A well-prepared buyer is more likely to submit a stronger, more competitive offer.
Preparation is obvious on paper. Sellers and listing agents immediately recognize when a buyer actually has their financing and due diligence in order. It reduces annoying counter-offers, speeds up the entire transaction, and drastically increases your chances of getting the keys.
Real buying confidence comes from total clarity, not taking a wild guess on a major investment.
The Bottom Line
Making an offer is arguably the most critical step in your entire homebuying journey. It is exactly where casual window shopping turns into a binding legal commitment.
Buyers who take the time to secure their financing, thoroughly evaluate the property, study local market comps, and understand their contract terms always experience fewer nasty surprises before closing day. Whether you are buying an older resale property or walking into a new construction model home in Windsor, Virginia, the real estate fundamentals never change.
A clear checklist does not slow you down. It helps protect your purchase. And in real estate, that upfront preparation is usually what makes all the difference between securing your dream home and losing it to someone else.
I once watched a DFW handyman tear out fresh drywall because the rough opening was a half inch too narrow for the prehung door sitting on the porch.
The door was fine. The opening wasn’t. He framed first and shopped second.
That small mistake cost him an afternoon, a sheet of drywall, and a callback he couldn’t bill for.
In North Texas, where slab-on-grade foundations, brick veneer, and both 2×4 and 2×6 walls are common, door planning needs to start before the framing is finished. When the rough opening is right, the door is easier to shim, latch, flash, and pass through inspection.
When it’s wrong, you end up patching drywall, reordering materials, or explaining a delay to the homeowner.
The safest rule is simple: plan the opening around the door unit, not the other way around. That gives the door the best chance of hanging, swinging, and latching correctly the first time.
Key Takeaways
Keep these basics in mind so you can frame once, order once, and avoid the mistakes that slow down the job.
Plan the rough opening before you buy: Match the framed opening to the manufacturer’s unit specs and the code requirements used by your local jurisdiction.
Egress matters: Every home needs at least one side-hinged egress door with a minimum 32-inch clear width and 78-inch clear height.
Exterior prehung doors need clearance: Most major brands call for a rough opening that is about an inch wider and about three-quarters of an inch taller than the assembled door unit.
Interior prehung doors need less room: Interior units usually need about half an inch of extra width and height, assuming the opening is square, level, and plumb.
Jamb depth has to match the wall: Common jamb depths are 4-9/16 inches for a 2×4 wall and 6-9/16 inches for a 2×6 wall, assuming half-inch drywall on both sides.
Sidelites change the math: A sidelite is the fixed glass panel beside the door, and it can add a lot of width to the required rough opening.
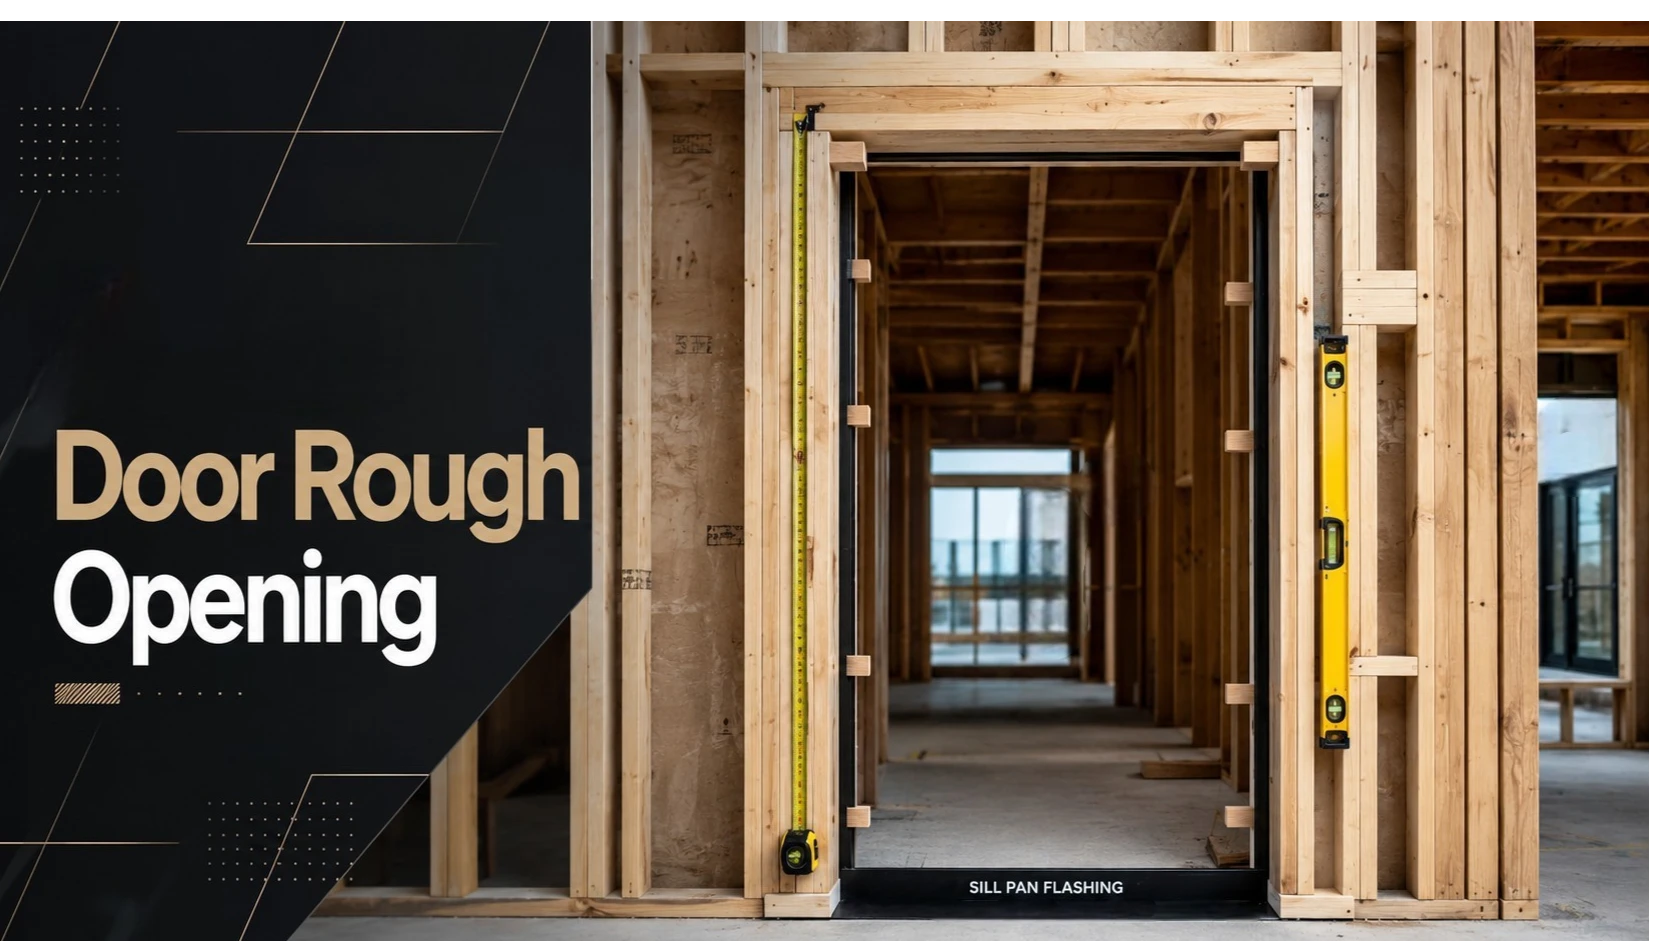
Flash exterior openings correctly: In the Dallas-Fort Worth area, a sill pan and self-adhered flashing tied into the wall wrap are essential for keeping wind-driven rain out of the wall assembly.
What Is a Rough Opening, and Why Does It Matter?
A rough opening is the framed space that holds the door unit, the shims, and the small adjustments needed during installation.
It is measured from stud to stud and from the subfloor to the bottom of the header. The opening needs to be larger than the assembled door unit so there is enough room to plumb, level, and square the jamb before fastening it in place.
It helps to know the framing terms. King studs run the full height of the wall. Jack studs support the header. Cripple studs fill the space above the header. The header carries the load over the doorway. When you buy a prehung door, the slab is already mounted inside the jamb.
Do not confuse clear width with rough opening width. Clear width is the usable walk-through space when the door is open 90 degrees. Rough opening width is the stud-to-stud measurement. The outside width of the door unit falls between those two numbers.
Most prehung doors need about half an inch of shim space on each side. Head clearance depends on the brand, threshold, and jamb design. Major manufacturers generally recommend keeping the extra width close to an inch total, so always check the installation sheet before framing or setting the door.
Why You Should Plan the Rough Opening First
Planning the rough opening early saves labor, reduces waste, and helps prevent service calls later.
Faster Installation
A square, level, and plumb opening lets you focus on setting the door instead of shaving studs, fighting bowed framing, or packing huge shim stacks into oversized gaps. On a remodel with multiple doors, that can save hours.
Fewer Material Returns
Accurate rough opening measurements help you avoid wrong-size units and jamb-depth mistakes. In the real estate market, one house may include both 2×4 and 2×6 walls, so verifying jamb depth before ordering matters.
Fewer Callbacks
North Texas clay soil can shift enough to expose weak door installation. Proper shim space, straight framing, and long hinge screws driven into the wall framing help keep the reveal even and the latch working smoothly.
Common Door Rough Opening Sizes
Standard planning sizes are useful early in the project, but the manufacturer’s spec sheet should always control the final rough opening.
Interior single prehung doors: A common planning rule is to add about two inches to the slab width and two inches to the slab height. For example, a 30×80 slab often needs a rough opening around 32×82. Exact tolerances vary by brand.
Exterior single prehung doors with a threshold: A standard 36×80 front entry unit often needs a rough opening around 38 inches wide and 82 to 82-1/2 inches tall. The final number depends on the threshold, trim, and jamb profile.
Entry doors with sidelites: Add the manufacturer’s sidelite width to the rough opening. Some framing tables allow about 1-1/2 inches for one sidelite and 3 inches for two, but the exact unit build should always be confirmed before cutting lumber.
Eight-foot doors: Check the full assembled unit height, not just the slab size. You may need to frame a higher header or adjust the floor transition to keep the exterior landing code-compliant.
Bifold, bypass, pocket, and barn doors: These systems use their own track kits and framing rules. Do not use standard swing-door rough opening dimensions for sliding or folding doors.
How to Measure a Rough Opening
Measure the width, height, and wall depth in multiple places. When ordering a door, use the smallest measurement.
Major brands such as JELD-WEN recommend taking three horizontal measurements and using the smallest one. That helps ensure the replacement unit fits even if the framing is not perfectly straight.
Step 1: Expose the framing
Remove the interior casing so you can see the true stud-to-stud opening. For exterior doors, confirm whether you are measuring from the bare subfloor or from the finished sill reference point.
Step 2: Measure the width
Measure between the trimmer studs at the top, middle, and bottom of the opening. Write down the smallest number, not the average.
Step 3: Measure the height
Measure from the subfloor or finished floor to the bottom of the header on the left, center, and right sides. If hardwood, tile, or another finished floor will be installed later, account for that buildup now so the door does not drag.
Step 4: Measure the wall depth
On interior walls, measure from the face of the drywall on one side to the face of the drywall on the other. On exterior walls, measure the full wall thickness. This tells you whether you need a 4-9/16-inch jamb, a 6-9/16-inch jamb, or custom jamb extensions.
Step 5: Check for plumb, level, and square
Put a level on both trimmer studs, check the header, and compare the diagonal measurements. If a stud is bowed, twisted, or out of plumb, fix the framing before ordering or setting the door.
If your measurements are inconsistent or the header looks off, use a visual guide before sending the numbers to your supplier. Doors for Pros has a useful walkthrough on measuring a door rough opening. It is a good field check before you order.
For most prehung doors, keep about half an inch of shim room on each side. If the existing opening gives you less than that, reframe it before installation.
How to Frame the Rough Opening Correctly
Straight studs, proper clearance, and good flashing matter just as much as the final dimensions.
Lay out the framing first
Set the full-height king studs, then install the jack studs that support the header. Size the header according to IRC span tables or an engineered detail when the opening is wide or carrying a heavy load. Fill the space above the header with cripple studs up to the top plate.
Straighten the opening before the door arrives
Plane, shim, or replace bowed studs before setting the unit. The hinge-side trimmer should be plumb because even a small crown can create an uneven reveal from top to bottom.
Keep the planned clearance
Do not tighten the rough opening just because it looks cleaner during framing. That extra space is what lets you make small adjustments during installation.
Prepare exterior openings for water
Install a sill pan and tie the self-adhered flashing into the house wrap so water drains out instead of into the wall. In Climate Zone 3A, which includes warm and humid areas like Dallas County, this is basic protection against heat, humidity, and wind-driven rain.
Prepare interior openings for support
Dry-fit the unit, pre-shim the hinge side if needed, and use long screws through the top hinge. Those screws need to bite into the wall framing, not just the soft jamb.
Code Checkpoints for North Texas Door Installations
Inspectors commonly focus on clear width, exterior landing heights, garage fire separation, and water management.
Dallas and Fort Worth currently use the 2021 International Residential Code with local amendments. but DFW jurisdictions vary. Some cities, like Frisco, have already moved to the 2024 codes, so verify the adopted code with the local authority before framing or ordering.
Primary egress door: Every house needs at least one side-hinged egress door with a minimum 32-inch clear width and 78-inch clear height. The clear width is measured from the face of the open door to the door stop with the slab open 90 degrees.
Exterior landing heights: At the required egress door, the interior floor landing cannot be more than 1-1/2 inches below the top of the threshold. Other exterior doors may allow a larger step-down in certain situations, but local amendments can change the rule.
Garage-to-dwelling fire separation: The door between the garage and the dwelling must be self-closing and self-latching, and must be a solid wood door, a solid or honeycomb-core steel door at least 1-3/8 inches thick, or a 20-minute fire-rated door. Inspectors may check the self-closing action on site, so do not rely on the fire label alone.
Climate note: Dallas County is in IECC Climate Zone 2A under the 2021 IECC. Some surrounding North Texas counties remain in Climate Zone 3A, so always confirm the project’s county and local jurisdiction before applying energy-code assumptions.
How to Shim, Set, and Troubleshoot the Door
Set the hinge side first, lock that vertical plane in place, and then adjust the rest of the unit around it.
Set the sill on the pan, tilt the unit into the opening, and fasten the hinge side through the shims. Drive long screws through the top hinge and into the framing. Once the hinge side is secure, adjust the latch side and head jamb until the reveal is even around the slab.
Before installing casing, check the swing, latch engagement, and weatherstrip compression. A small bind is much easier to fix before the trim goes on.
If the rough opening is too small, reframe it. Forcing a prehung door into a tight opening removes the adjustment space and usually causes a bad reveal or sticky latch.
If the rough opening is too large, add solid filler framing. Do this wherever the shim stacks would be too thick. Also confirm that the casing will still cover the drywall gap.
If the jamb depth does not match the wall, fix the jamb. Use custom jamb extensions or reorder the door with the correct jamb depth. A 4-9/16-inch jamb in a 2×6 wall will leave a gap that standard casing will not hide.
If the studs are out of plumb, correct the framing first. Trying to solve bad framing with oversized shim stacks usually creates another door problem.
A Quick Closeout Checklist
A quick closeout check can catch most fit and code issues before trim, inspection, or handoff.
Before calling for inspection or turning the project over to the homeowner, confirm the following:
The rough opening matches the manufacturer’s size tolerances.
The opening is square, level, plumb, and properly flashed for exterior exposure.
The hinge side is locked in place with long screws driven into structural framing.
The door reveal is even, the latch works smoothly, and the sweep and threshold are adjusted.
Egress sizes, exterior landing heights, and garage fire-separation rules have been checked where they apply.
The door model, jamb depth, and final rough opening dimensions are recorded in the project notes.
Quality door work starts before the delivery truck arrives. The cleanest installations come from accurate measurements, straight framing, proper shim space, and flashing that can handle the local climate.
Frequently Asked Questions
How much bigger should the rough opening be than the door?
It depends on whether you are measuring the slab or the assembled prehung unit. Most exterior prehung doors need a rough opening about an inch wider and about three-quarters of an inch taller than the unit’s outside dimensions. Most interior units need about half an inch of extra width and height. The manufacturer’s installation sheet is the final authority.
What is the rough opening for a standard 36×80 front entry door?
A common framing range is about 38 inches wide by 82 to 82-1/2 inches tall for a standard 36×80 exterior prehung unit. The exact size depends on the threshold, jamb, and trim profile, so confirm the manufacturer’s specs before cutting.
Do I need a sill pan for an exterior door in North Texas?
Yes. A sill pan and proper flashing are inexpensive protection against water intrusion. In the Dallas-Fort Worth area, wind-driven rain can push moisture into small gaps, so the pan should drain outward and tie into the rest of the flashing system.
How do I choose between a 4-9/16-inch and 6-9/16-inch jamb?
Measure the actual wall thickness on site. A typical 2×4 wall with half-inch drywall on both sides uses a 4-9/16-inch jamb. A 2×6 wall with the same drywall setup uses a 6-9/16-inch jamb. For non-standard wall thicknesses, order custom jamb extensions.
What kind of door is required between the garage and the house?
Under IRC R302.5.1, the opening between the garage and the dwelling requires a self-closing solid wood door, a solid or honeycomb-core steel door at least 1-3/8 inches thick, or a 20-minute fire-rated assembly. In practice, inspectors may verify both the door material and the self-closing hardware during the final inspection.
If you own a restaurant in Redmond and are getting ready to put it on the market, you already know the competition is fierce. Today’s buyers rarely want to invest in a dated place, which means a strategic remodel can make all the difference.
The new owner might want to invest their own money into changing the dining area and the exterior to fit their specific concept, but they expect the core infrastructure to be modern and turnkey. So if you want to sell your restaurant for top dollar, here are the essential trends in kitchen and bathroom remodeling you should consider.
Top Kitchen Remodeling Trends
It’s no surprise that local design trends in Redmond favor innovation. With Microsoft and other tech companies right in our backyard, buyers expect commercial kitchens to feature the latest upgrades. This includes
Touchless and Smart Technology: The kitchen is a fast-paced environment where every second counts. Installing motion-activated sink faucets, contactless ticketing systems, and automated HVAC controls makes your staff significantly more efficient. As a bonus, smart climate control helps energy costs go down and keeps the back of house comfortable during busy shifts.
Open and Multi-Functional Layouts: While an open-concept layout doesn’t work for every business, adding an open or semi-open kitchen is highly attractive in today’s social media-driven dining scene. Allowing patrons to see the culinary process adds to the dining experience and boosts reservations, since patrons will appreciate the effort behind making their delicious meals.
Durable and Hygienic Surfaces: Food safety is the foundation of any successful restaurant business. Upgrading to seamless, solid-surface large-format panels and high-grade stainless steel allows for safe food prep and easy washdowns. Buyers will immediately recognize the value of a kitchen built for rigorous sanitation standards.
Sustainable Upgrades: Energy efficiency is a major selling point in Redmond. Investing in energy-efficient cooking equipment, water-saving pre-rinse spray valves, and LED task lighting is a smart move. Prospective buyers will be very happy to know that they are going to pay less for overhead utility costs.
Must-Have Restroom Upgrades
A restaurant’s restroom significantly impacts a customer’s overall impression of the establishment. Guests expect clean, modern facilities, and an outdated bathroom can quickly hurt a restaurant’s reputation. A mid-2020s aesthetic is essential.
Consider the following features:
Touchless Fixtures: High-traffic restrooms require diligent sanitation. Swapping out traditional hardware for action-activated faucets, soap dispensers, and paper towel dispensers minimizes cross-contamination and provides a premium experience for both customers and staff.
Biophilic Design Elements: Incorporating natural elements like warm wood accents or living moss walls brings a modern touch indoors. Pairing these earthy details with flattering, warm ambient lighting rather than harsh, cold fluorescents creates a much more inviting and upscale atmosphere.
Water Conservation: Utility bills are a major consideration for any restaurateur. Installing low-flow toilets and sensor-controlled urinals drastically mitigates water usage. It’s an eco-friendly upgrade that directly translates to lower monthly operating expenses for the new owner.
Maximizing Your Restaurant’s ROI
It might seem counterintuitive to pour capital into a space you are about to leave. You’re not going to be using this equipment after all, so why upgrade it only to hand the keys over to the buyer?
The reality is that strategic renovations yield a higher return on investment and help your listing stand out in the competitive real estate market. When selling a commercial property, potential buyers heavily weigh the condition of the back of house and the public facilities.
While a new owner will inevitably shape the menu and front-of-house vibe to their own brand, they want the peace of mind that comes with a fully updated, code-compliant kitchen and pristine restrooms.
Selling a restaurant can cause stress even when business is successful. You don’t want to do anything to possibly lower the valuation … and buyers will be looking for every reason to do just that. While it’s normal for buyers to take on some renovation or remodeling, just like a home, it’s also possible to make it much more appealing and valuable.
Will doing this guarantee that you’re going to get the best return? No, but it’s still something that is worth doing. There’s nearly a 100% chance you won’t get a lower valuation than if you didn’t do it and that makes it worth it.
For many small business owners, space becomes a challenge long before they expect it. Inventory grows quickly during busy seasons, equipment takes over every inch of the storeroom, and commercial rent continues to rise in many markets. As businesses look for ways to expand without driving up overhead costs, shipping containers have become an increasingly practical option for both storage and retail space.
Storage is one of the first challenges many businesses face as they expand. Contractors need additional space for tools and materials while retailers need room for overstock, and landscaping companies need somewhere to keep seasonal equipment.
Shipping containers solve those problems by providing storage that is secure, durable, and relatively affordable. With simple upgrades like shelving, lighting, or ventilation, they can easily be adapted to fit specific operational needs.
Many business owners also appreciate the convenience of having storage directly on-site. Instead of driving to an off-site warehouse or storage facility, employees can quickly access tools, inventory, or equipment throughout the workday, helping improve efficiency and reduce downtime.
Lower Costs and Increased Flexibility
One reason shipping containers have become so popular among small businesses is cost control. Expanding into larger commercial space often requires significant upfront investment and long-term lease commitments. For businesses still growing or testing new markets, that level of financial commitment can create unnecessary risk.
Containers offer small businesses a more flexible alternative. Purchasing a used or new one trip shipping container is generally far less expensive than leasing additional retail or warehouse space, and even customized retail-ready units usually cost less than a traditional commercial buildout.
Using Shipping Containers as Retail Space
Beyond storage, though, containers are increasingly being used as retail and customer-facing spaces. Coffee shops, boutiques, salons, breweries, and specialty retailers have all embraced shipping container-based solutions.
Part of the appeal is financial, but shipping containers also offer a distinct visual presence that helps businesses stand out. A well-designed container storefront naturally attracts customer attention in ways that many traditional retail spaces don’t.
Pop-up shops are one of the most common examples. Shipping containers can be converted into compact retail units with windows, lighting, branding, and climate control, then placed in high-traffic areas such as downtown districts, outdoor markets, festivals, or mixed-use developments.
For small businesses, this creates opportunities that might otherwise be out of reach financially. A clothing brand can test a new neighborhood before signing a lease, just as a coffee business can establish a presence near office buildings or event venues, and retailers can participate in seasonal markets using a consistent and recognizable setup.
Shipping containers also work well for hybrid business models that combine online sales with physical retail. Some businesses use part of the container as a showroom while the remaining space stores inventory for local fulfillment and shipping. This setup allows owners to maintain a physical presence without the expense of a large storefront.
Faster Timelines Than Traditional Construction
Speed is another major advantage of using shipping containers for retail expansion. Traditional construction projects can take months once permitting, contractors, and materials are factored in. Shipping containers dramatically shorten that timeline because the primary structure already exists.
For businesses responding to seasonal demand or short-term opportunities, that speed matters. A company can move quickly on a high-traffic location or event opportunity without dealing with a lengthy construction timeline.
Branding and Customer Experience
Exterior paint, signage, landscaping, lighting, and large windows can transform a shipping container into a polished and inviting storefront. Interior finishes help create a space that feels intentional rather than temporary.
For many small businesses, the containers become part of the brand itself. Their unique appearance often attracts customer attention and creates opportunities for social media visibility, especially in busy retail environments where standing out is increasingly important.
Key Things to Consider
Shipping containers are flexible, but they aren’t without their challenges. Local zoning laws and permitting requirements vary significantly depending on the municipality and intended use.
Storage applications are generally easier to approve than customer-facing retail spaces, which may require additional inspections related to accessibility, safety, and occupancy. Before investing in a shipping container project, business owners should check local regulations and confirm site requirements.
Climate control is another important factor. Steel containers heat up quickly in warm weather and can become quite cold in winter conditions without proper insulation and ventilation.
Shipping containers aren’t a perfect solution for every business, but they address many of the challenges small companies face when trying to grow responsibly. They provide affordable storage, adaptable retail space, and a lower-risk path to expansion in an increasingly expensive commercial real estate market.
For some businesses, shipping containers remain a behind-the-scenes operational tool while for others, they become a visible part of the brand experience. In both cases, the value comes from flexibility and cost control.
As more businesses look for ways to operate efficiently without overcommitting financially, shipping containers are likely to remain a practical option for storage, retail expansion, and long-term growth.
A property’s true value goes far beyond the asking price and a fresh coat of paint. In the DFW market, two properties with the exact same square footage and finishes can perform very differently over time. Why? Because location, ownership rights, zoning, and future development all dictate a property’s long-term worth.
A high-priced property might actually be a bargain if it offers serious commercial upside, redevelopment opportunities, or sits in a rapidly growing neighborhood. On the flip side, an affordable home often hides costly repairs, drainage issues, title concerns, or restrictive HOA rules.
Smart buyers look beyond the photos. They study legal documents, operating costs, neighborhood trends, and future usability before making an offer. Whether you are buying a family home or a commercial investment, this guide explains the hidden factors that actually drive real estate value in North Texas.
What Does Hidden Property Value Actually Mean?
Hidden property value boils down to a property’s real-world usefulness and long-term upside. It includes legal rights, location quality, future development potential, and the flexibility to use the property how you want.
In the Metroplex, hidden value often comes from zoning flexibility, nearby growth, parking access, rental potential, and road visibility. A property near expanding retail or employment corridors will naturally appreciate faster than one in a stagnant area.
But hidden value can also work against you. Foundation damage, flood risk, old plumbing, unclear title history, or strict deed restrictions can kill your investment, even if the building looks attractive during a showing.
The Hidden Value Factors That Matter Most
These are the specific details that make or break your future resale value, ownership flexibility, income potential, and long-term operating costs:
Buyers who review these areas early make better financial decisions and avoid costly surprises at the closing table.
Listing Price vs. True Property Value: What Is the Difference?
The listing price is just a number the seller wants, while the true property value reflects what the property is realistically worth over time. The difference matters because visible upgrades do not always equal strong long-term value.
A remodeled kitchen or fresh paint may look great, but foundation problems, zoning restrictions, or high operating costs will quickly drain your equity. Meanwhile, an outdated property in a fast-growing corridor may hold massive untapped value.
Here’s a quick comparison:
Listing Price
True Property Value
Based on what the seller wants or expects
Based on the property’s real long-term worth
Often influenced by appearance and market positioning
Looks deeper at condition, ownership rights, and actual risks
Rarely accounts for hidden issues
Includes hidden risks that could affect value
Works as a starting point for negotiation
Should guide your final offer
Legal and Ownership Details You Can’t Ignore
Always review the title history, easements, deed restrictions, liens, and HOA rules before committing to any property. These legal details control what you actually own and what you are legally allowed to do with it.
An easement may limit where you can build an addition. HOA rules may restrict rentals (like Airbnb), parking, fencing, or running a business out of the property. Older properties may also carry outdated surveys or unresolved permits.
Important documents to request include:
Title commitment
Seller disclosures
Property survey
HOA documents
Permit history
Easement records
Tax history
Zoning confirmation (for commercial use)
What Are Mineral Rights and Why Do They Matter in Texas?
Mineral rights are property rights connected to underground resources like oil and gas. In Texas, it is very common for these rights to be separated from surface ownership. This means you might own the house, but someone else owns the rights to the resources underneath it.
This matters because mineral ownership can affect long-term property value and future financial opportunities. Always confirm whether any mineral interests are included in the sale and whether previous leases or reservations exist.
Understanding mineral rights value helps explain why some Texas properties hold value beyond the surface land itself.
How Easements, HOA Rules, and Deed Restrictions Affect Value
These rules directly impact your property value by limiting your flexibility. Some restrictions protect neighborhood quality, while others can become a massive headache.
A utility easement may block future construction plans. HOA rules may limit rentals, parking, landscaping, or exterior changes. Deed restrictions may prevent commercial use or specific renovations.
Never assume you can freely modify a property without reading the fine print first.
Why Location is More Than Just a Zip Code
Location creates value by driving convenience, resale demand, safety, and future growth. In Dallas, location quality almost always trumps cosmetic upgrades.
Properties near strong job centers, retail growth, highways, schools, or transit access hold stronger long-term value. Commercial properties with good visibility naturally attract more business traffic and future redevelopment interest.
Buyers should evaluate:
Commute patterns
Flood and drainage history
School district quality
Nearby retail and grocery access
Future development projects
Walkability and traffic flow
Noise from highways or nightlife
A property’s surroundings often shape its future value more than the building itself.
Spotting Commercial and Mixed-Use Potential
If you are looking at real estate from an investment standpoint, commercial potential is a huge factor. It is the ability of a property to support business activity, mixed-use conversion, rental income, or future redevelopment. Many transitional neighborhoods continue to shift toward mixed residential and commercial zoning.
Depending on local laws, a property may support retail, office, café, medical, or foodservice use. Even residential buyers should pay attention to nearby commercial activity because it affects traffic, convenience, taxes, and resale value.
The most important issue is permitted use. A building may look ideal for a storefront, but it might still require zoning approval, parking upgrades, or utility improvements before you can open for business.
The Value of Signage and Street Visibility
For commercial buyers, street visibility increases property value because businesses thrive on customer exposure and traffic. Retail, restaurant, and service-based properties command higher prices when they sit on busy corridors with clear frontage.
Visibility depends on road traffic, signage placement, lighting, and nearby intersections. However, always confirm local permit and zoning rules before assuming large signs or illuminated displays are allowed.
Existing Infrastructure: Kitchens and Foodservice
Kitchen or foodservice potential matters hugely when a property could support a restaurant, café, bakery, ghost kitchen, or catering operation.
Foodservice properties require heavy-duty plumbing, ventilation, electrical capacity, refrigeration space, and fire safety systems. A building with these systems already installed saves buyers tens of thousands of dollars in renovation costs.
When reviewing restaurant layouts and equipment needs, information about commercial kitchen equipment helps buyers understand how infrastructure affects long-term business value.
Hidden Costs That Destroy Your Budget
Renovation and operating costs can significantly change the true cost of ownership. A property with a low purchase price may still require major spending after closing.
The biggest cost factors include:
Roof and foundation repairs
HVAC replacement
Plumbing and electrical upgrades
Insurance premiums
Property taxes
Utility costs
Permit and compliance expenses
Drainage correction work
Commercial properties may also require ADA improvements, grease traps, parking changes, or fire safety upgrades. You need to estimate these costs before negotiating the final price.
How to Spot Hidden Value Before You Buy
Auditing hidden property value means reviewing the legal, structural, financial, and future-use details before purchasing.
Follow these six key steps:
Review the listing carefully for missing details or vague descriptions.
Check title history, easements, and ownership records.
Confirm zoning and permitted use.
Hire inspectors to evaluate the structure and systems.
Estimate repair, tax, insurance, and utility costs.
These questions often reveal problems that are impossible to spot during a property showing.
Red Flags That Turn Value Into Risk
Hidden value becomes hidden risk when attractive features are outweighed by structural problems, legal restrictions, or unrealistic renovation assumptions.
The biggest warning signs include:
Unclear ownership or title history
Major foundation movement
Flood or drainage issues
Restrictive zoning rules
High insurance costs
Unrealistic renovation estimates
Always be skeptical when properties are heavily discounted without a clear explanation.
The Bottom Line
You should look beyond the listing price because true property value depends on far more than appearance. Ownership rights, zoning, location quality, operating costs, and future use all shape long-term value.
A property with strong fundamentals will easily outperform a more attractive home in a weaker location. At the same time, hidden repairs or legal restrictions can quickly turn a cheap property into an expensive nightmare.
The smartest buyers treat every property as both a functional space and a long-term financial asset.